Category: CW Training

Practical listening and sending exercises for building reliable Morse code recognition, rhythm, and on-air confidence.

  • From CWO and CW Hotline to CW Room: When CW Moves onto the Internet

    From CWO and CW Hotline to CW Room: When CW Moves onto the Internet

    When radio amateurs think of CW, we usually picture a transceiver, an antenna, propagation, and a pair of headphones filled with dits and dahs fading in and out of the noise.

    That is still where much of the magic of CW lives.

    But the Internet has created an interesting new question:

    What if we keep the real Morse key, the operator's timing, and the customs of a real CW QSO, but temporarily replace the radio path with the Internet?

    Projects such as CWO — CW over Internet, CW Hotline, and now CW Room on CW599 approach that question from three different directions.

    They do not need to replace radio.

    They can instead become another way to experience and practice CW.


    What is CWO?

    First, a clarification.

    The CWO discussed here means CW over Internet, a project initiated by BG5ESN. It should not be confused with the CW Open contest organized by CWops.

    The idea behind CWO is remarkably simple:

    Turn the Internet into a virtual CW band.

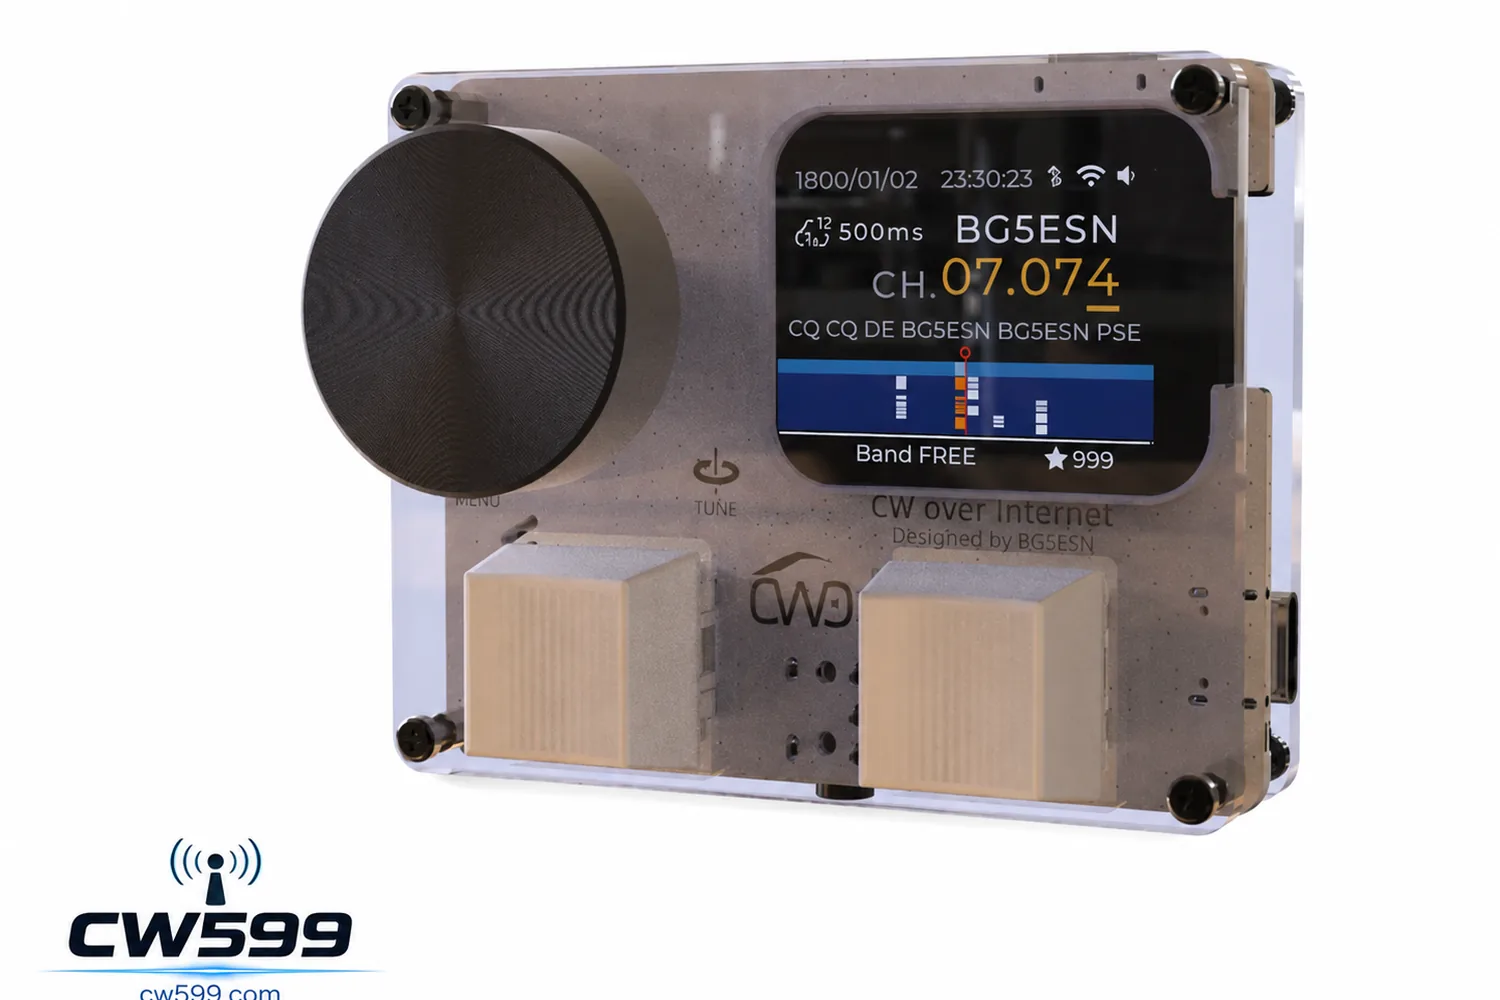
    CWO uses dedicated Wi-Fi hardware that can accept a real straight key or paddle. It includes features such as CW decoding, a waterfall display and selectable virtual frequencies.

    Its documentation describes the system as a broadcast-style environment designed to simulate real CW operation. Operators can tune around, listen for activity, choose a frequency and communicate much as they would on a radio band.

    That makes CWO very different from a normal online chat room.

    You are not typing Morse characters into a text box.

    You are still sending CW.

    How do you use CWO?

    After registration and Wi-Fi configuration, the user connects the unit to an available CWO server.

    From there, the experience starts to resemble a miniature software-defined radio:

    1. Tune to a virtual frequency.
    2. Look and listen for activity.
    3. Find an unused frequency.
    4. Connect a straight key or paddle.
    5. Call CQ.
    6. Complete a QSO using normal CW procedure.

    The current CWO documentation even suggests different sections of its simulated spectrum for different skill levels.

    For example, 7.000–7.010 is suggested for roughly 15–20 WPM beginner contacts, while 7.011–7.040 is intended for broader practice. A higher-speed section is also provided where users are encouraged to operate without relying on the decoder, and separate frequencies are available for automated copy practice.

    It is therefore more than a Morse tutor.

    A better description might be:

    a CW band that happens to live on the Internet.

    What is CW Hotline?

    CW Hotline takes a different approach.

    Developed by Ham Radio Solutions, it is a Wi-Fi-connected CW device that the company rather memorably describes as a kind of “Bat Phone” for CW.

    Two CW Hotline units can be linked through the Internet.

    When one operator keys Morse, the other unit reproduces the sender's timing and “fist” rather than simply transmitting decoded text.

    The hardware can work with built-in or external paddles and straight keys, provides sidetone audio, and can also connect to the VBand Internet CW service.
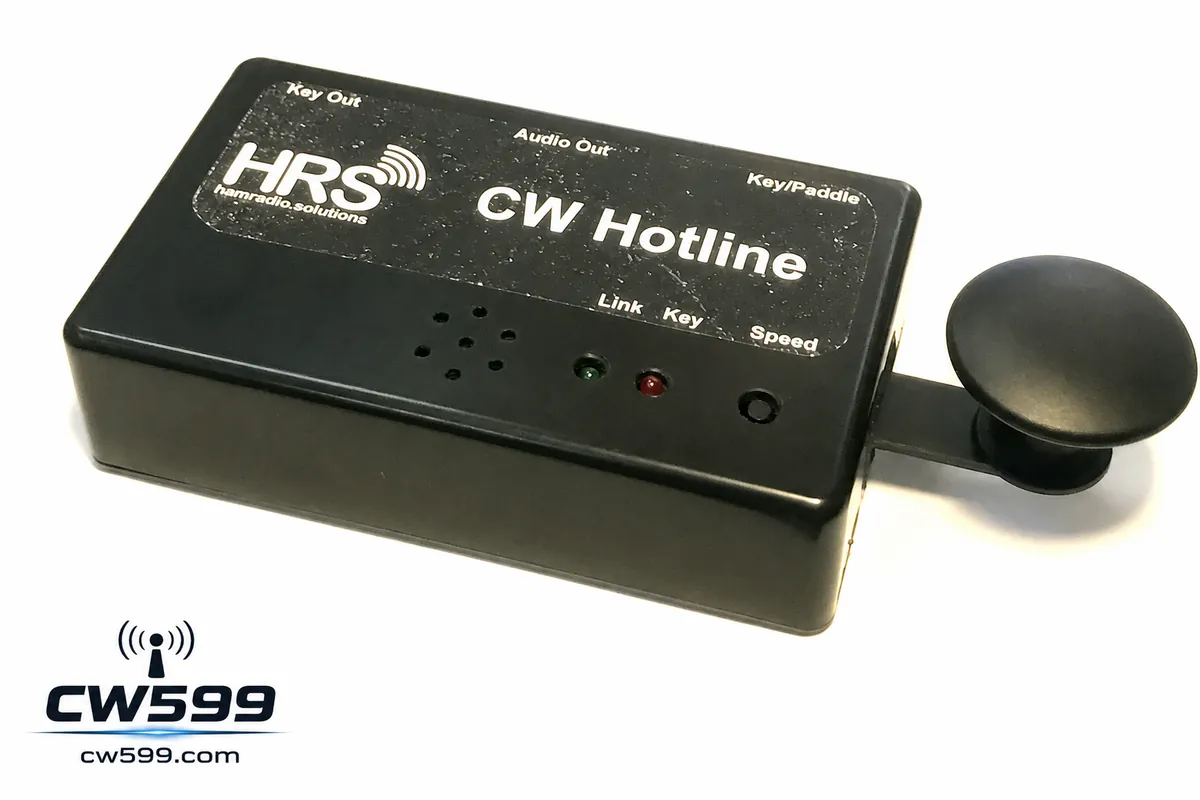
    CW Hotline device with its paddle
    CW Hotline uses a physical keying interface to create a private Internet CW link.

    So while CWO feels like entering a public virtual radio band, CW Hotline can feel much more like:

    a private telephone line that only speaks Morse code.

    The particularly interesting part: remote radio keying

    CW Hotline can do something even more interesting.

    It provides a keying output for an external transmitter.

    That means one unit can sit beside a real radio station while another is located somewhere else.

    Your keying actions travel over the Internet to the remote CW Hotline, which then keys the actual transceiver.

    Ham Radio Solutions lists low-latency remote CW station keying as one of the system's primary uses.

    We can therefore think of modern CW in three different ways.

    Traditional CW

    Key → radio → antenna → ionosphere → radio

    Internet CW

    Key → Internet → another Internet CW device

    Remote-radio CW

    Key → Internet → remote radio → antenna → ionosphere

    The path changes.

    The operator's hand can remain on the key.

    Why does Internet CW matter?

    There is a difficult stage in learning Morse that software trainers alone do not completely solve.

    You know the alphabet.

    You have practiced copying.

    Maybe you can copy random callsigns at 15 or 20 WPM.

    Then one evening you turn on the radio and hear:

    CQ CQ CQ DE ...

    And suddenly you do not want to answer.

    CW operators sometimes call this key fright.

    An ARRL review of CW Hotline described essentially this problem: the author had studied Morse and made some contacts, but still felt that improving required more practice with real people in a lower-pressure environment.

    That is where Internet CW becomes particularly valuable.

    There is a missing step in the traditional learning path:

    Trainer → ? → Real on-air QSO

    The question mark can be a practice environment populated by actual humans.

    That is where CW Room comes in

    This is also part of the reason we created CW Room at CW599.

    It shares some ideas with CWO and CW Hotline, but takes another route.

    Our starting point was simple:

    Do not require special hardware before someone can enter the room.

    A browser should be enough.

    CW Room currently simulates part of the 40-meter CW band from 7.000 to 7.050 MHz. Users can tune by clicking or dragging across the activity display, or by entering a frequency directly. A waterfall-style view shows recent activity.
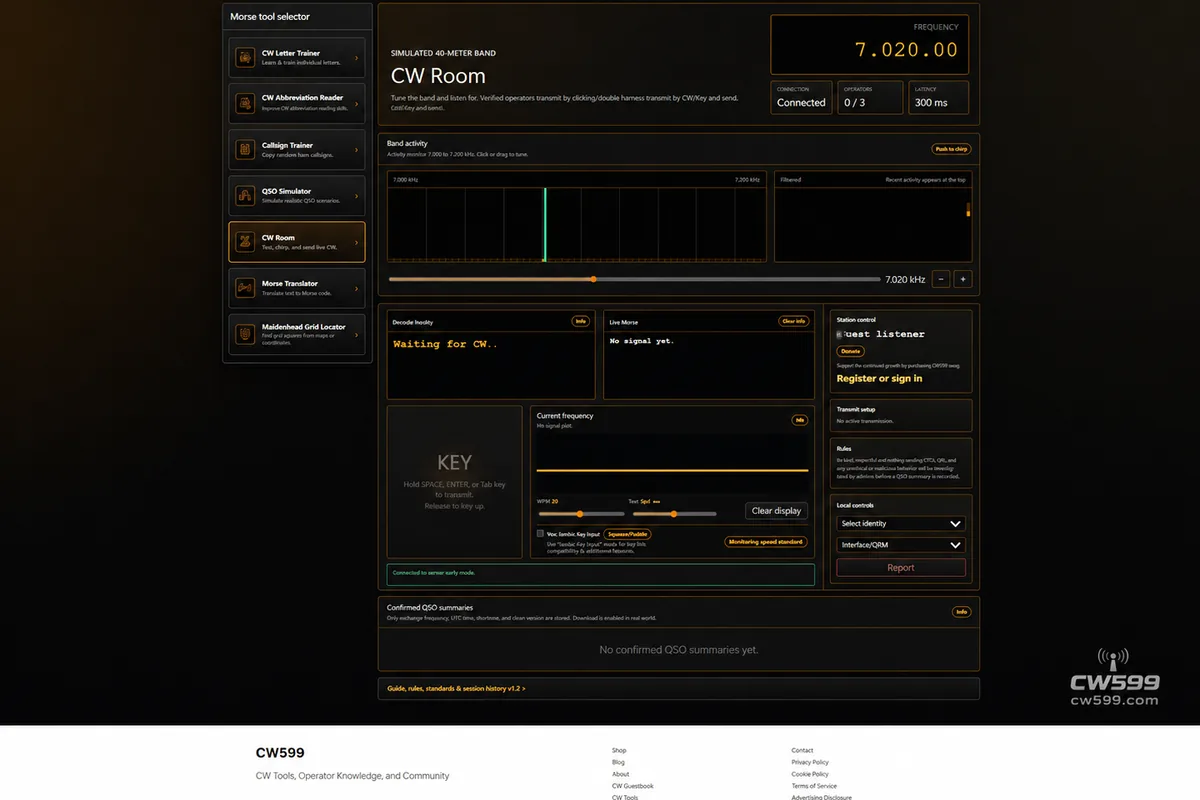
    CW599 CW Room interface
    CW Room brings band activity, tuning, listening, and keying controls into the browser.

    It is not a conventional text chat.

    There is no message box where you type a sentence and click Send.

    If you want to talk, you have to send CW.

    How to use CW Room

    1. Tune around first

    Enter the room and look across 7.000–7.050 MHz.

    If you see activity, tune to it and listen.

    The basic behavior is intentionally similar to turning the VFO on a real radio.

    2. Listen before transmitting

    One of the operating principles of CW Room is simple:

    Listen first.

    Before calling CQ, make sure another QSO is not already taking place on the frequency.

    It is partly a technical rule, but it is also practice for good operating behavior on real amateur bands.

    3. Use your keyboard as a Morse key

    You do not currently need dedicated hardware.

    Holding SPACE or ENTER keys the transmitter.

    Releasing the key ends the element.

    An experimental mobile mode can also use a phone's volume buttons as a Morse key, although support varies between devices and browsers.

    So even a phone can become a very primitive CW terminal.

    4. Call CQ and make a contact

    Find a quiet frequency and send something like:

    CQ CQ CQ DE BA7XXX BA7XXX K

    Another operator can tune to your frequency and answer:

    BA7XXX DE XX1XXX K

    From there, the contact can follow normal CW procedure.

    Exchange:

    • Callsigns
    • RST
    • QTH
    • Name
    • Rig
    • Antenna
    • Weather

    Or simply have a CW ragchew.

    CW Room currently uses a three-seat roundtable model, limiting the number of active transmitters on one frequency to help avoid chaotic overlapping transmissions.

    5. Finish the QSO

    A completed contact can be closed by sending:

    CFSK

    At least two authenticated participants must independently confirm the contact before CW Room generates a QSO summary.

    The current system stores only summary information such as callsigns, frequency, UTC time, duration and rules version for normal confirmed contacts; decoded conversation content is not retained as the QSO record.

    This gives CW Room a little of the feeling of a logbook.

    But it is important to be clear about what it is not.

    A contact conducted entirely inside CW Room is an Internet CW contact, not an RF amateur-radio QSO.

    The purpose is practice and communication, not the creation of artificial DXCC contacts.

    CW Room should not replace radio

    This principle matters to us.

    If CW Room became so convenient that users stopped turning on their radios, we would have built the wrong thing.

    The ideal journey looks more like this:

    CW Letter Trainer

    Callsign Trainer

    QSO Simulator

    CW Room

    Turn on a real transceiver

    Complete your first RF CW QSO

    This may eventually become one of the most important roles of CW599.

    CW Room is not the destination.

    It should be the last practice room before you go on the air.

    Where could CW Room go next?

    The current version is only the beginning of that idea.

    There are several directions we would like to explore.

    Real Morse keys

    Today, SPACE and ENTER can act as keys.

    The obvious next step is:

    USB interface + straight key or paddle → browser → CW Room

    At that point, a Begali paddle, Vibroplex bug, homebrew key or an old military straight key could become an Internet communication device.

    And ideally, the system should preserve exactly what makes every operator different:

    timing.

    spacing.

    rhythm.

    fist.

    Because CW is not fundamentally a sequence of characters.

    CW is timing.

    Elmer-to-beginner practice

    Imagine a learner who has just reached 10 WPM entering a beginner area.

    An experienced CW operator is already there, slowly sending:

    CQ NEW CW OP

    The learner answers.

    They make a simple QSO.

    The learner makes a mistake.

    Nothing terrible happens.

    They send a few dits, correct the word and continue.

    That psychological difference matters.

    Making mistakes on an Internet practice frequency is much easier than overcoming the fear of making them during your first real 40-meter QSO.

    CW classrooms

    CW Room could eventually support scheduled practice sessions such as:

    Beginner CW — 10 WPM

    Ragchew — 18 WPM

    High Speed CW — 30+ WPM

    An instructor could operate with a small roundtable of students.

    At that point CW Room stops being just another web utility.

    It starts looking more like a permanently open Internet CW club.

    A bridge from simulation to radio

    The larger vision for CW599 is to connect several currently separate activities:

    learning Morse

    practicing callsigns

    learning QSO procedure

    talking to real people through Internet CW

    understanding your radio

    getting on the air

    Imagine learning CQ on CW599 today.

    Practicing a QSO tomorrow.

    Making your first human contact in CW Room next week.

    Then one evening you close the browser and turn on an FT-710, IC-7300, KX2 or QCX.

    You tune around 7 MHz.

    Put on your headphones.

    And hear:

    CQ CQ CQ DE ...

    This time, it does not feel unfamiliar.

    You answer.

    The Internet changes the path, not CW itself

    CWO, CW Hotline and CW Room demonstrate something interesting.

    CW did not become obsolete when the Internet arrived.

    Instead, the Internet gave CW another medium to explore.

    CWO turns the Internet into a virtual radio band.

    CW Hotline turns it into a Morse cable stretching across cities and countries.

    CW Room is trying to lower the entrance barrier even further:

    open a browser, tune to a frequency, listen for a while, and start keying.

    But eventually we still hope you turn the radio on.

    Because a simulated 7.020 MHz does not really have QSB.

    It does not have genuine QRM.

    Propagation does not suddenly open.

    And at two in the morning, a 5-watt station from the other side of the world will not unexpectedly rise out of the noise in your headphones.

    The Internet can reproduce many parts of CW.

    It cannot reproduce all of radio.

    And perhaps that is exactly why radio — and CW — remains so fascinating.

    When Everything Fails, CW Still Works.
    Sources and further reading

  • Straight Key vs Paddle vs Sideswiper: Which CW Key Should You Learn?

    Straight Key vs Paddle vs Sideswiper: Which CW Key Should You Learn?

    Choosing a first CW key is easier when you stop looking for the one “correct” key. A straight key, a paddle connected to an electronic keyer, and a sideswiper all let you put real Morse code on the air. They differ mainly in hand motion, who controls element timing, and the kind of practice that feels satisfying.

    This is not a speed ranking. A careful operator can send pleasant code with any of these tools, and a new operator can make uneven code with any of them. The useful question is: which mechanism helps you build a relaxed, understandable fist for the QSOs you want to have?

    ARRL’s CW Mode overview lists both straight keys and paddles among the familiar CW tools. The Straight Key Century Club also treats the straight key and the side-to-side sideswiper (or cootie) as distinct manual key types. A paddle is different because it normally works with an electronic keyer.

    The short answer

    Choose a straight key if you want to learn deliberate element timing with a simple up-and-down motion. Choose a paddle and electronic keyer if you want the keyer to make consistent dits and dahs while you concentrate on spacing and rhythm. Choose a sideswiper if the hand-made, side-to-side style appeals to you and you are happy to time every element yourself.

    None of these choices prevents you from learning the others later. In fact, a short session on a different key can reveal a tension or spacing habit you did not notice on your usual one.

    What changes from key to key

    Key typeMain hand motionWho times dits and dahs?Typical connection
    Straight keyPress and release verticallyYouStraight-key input, or a keyer/transceiver set for straight-key mode
    PaddleMove one or two levers sidewaysElectronic keyerPaddle/keyer input with separate dit and dah contacts
    Sideswiper (cootie)Push one lever left and rightYouA mechanical-key or suitable key input; check the radio/keyer manual

    The table is a starting point, not a wiring diagram. Transceivers and external keyers do not all label inputs the same way. Before transmitting, read the manual and test into a dummy load or receive your own sidetone. Never assume that a paddle connector is interchangeable with a straight-key connector.

    Straight key: direct timing in a vertical motion

    With a straight key, closing the contact starts an element and releasing it ends the element. Your hand therefore controls the length of every dit and dah, the gaps inside a character, and the spaces between characters and words. The mechanism is simple; the skill is in making those decisions consistently.

    That directness is why many beginners find a straight key educational. It makes uneven element lengths immediately audible. Try a short drill such as PARIS PARIS at an unhurried speed. Record your sidetone, then listen for three separate things: equal dits, dahs about three dit lengths, and clean spaces. If one part is rough, slow down before changing equipment.

    A straight key is also a natural fit for the historical and social side of CW. It remains welcome in activities such as ARRL Straight Key Night and SKCC operating. But it is not only a nostalgia device: a well-adjusted key and a loose hand can produce a clear conversational QSO.

    The trade-off is fatigue risk when you push a vertical motion too hard or too long. Do not grip the knob tightly, lock the wrist, or chase a speed that makes the code blur. Change posture, take breaks, and keep the key from sliding. Persistent hand or arm pain is a reason to stop and rethink the setup, not to “train through” it.

    Paddle: the keyer shares the timing work

    A paddle has separate contacts for dits and dahs. In common use, an electronic keyer makes the element lengths: hold the dit lever and it repeats dits; hold the dah lever and it repeats dahs. The operator still controls when a character begins and ends, which elements are requested, and the spacing between characters and words.

    That division of work can make the first on-air experience less intimidating. Set a comfortable keyer speed, use a short practice word, and listen for whether your letters are separated cleanly. The keyer can make a perfectly proportioned dit while you can still run words together; a paddle is not an automatic cure for rhythm.

    Single-lever and dual-lever paddles are both valid. A dual-lever paddle can be used one side at a time just like a single-lever paddle. With an iambic-capable keyer, pressing both levers can alternate dits and dahs. CWops explains that this “squeeze” technique is optional, not a requirement for owning a dual-lever paddle, in Iambic Keying—Debunking the Myth.

    For a beginner, start with one lever at a time. Learn to send a small set of letters cleanly before experimenting with squeeze patterns or a particular keyer mode. You do not need iambic technique to make good CW, and you should not buy a new radio merely to obtain it.

    Sideswiper: manual timing with a lateral rhythm

    A sideswiper, often called a cootie, has one lever that you move left and right to close alternate contacts. Every dit and dah is still made manually. The alternating motion can feel very different from pressing a straight key, and it can create an individual, rhythmic “fist.”

    The CWops edition of *The Art and Skill of Radio-Telegraphy* describes sideswiper sending as alternating left-right or right-left movements. SKCC explicitly includes sideswipers/cooties alongside straight keys and bugs in its manual-key activities. Those sources are useful reminders that a sideswiper is a real operating instrument, not a novelty prop.

    Because timing remains manual, start slowly. A useful first drill is to send short alternating-pattern letters such as A, N, R, and K, then stop and listen. Do not force a left-right alternation where it makes a character awkward; clarity matters more than a decorative rhythm. As with any manual key, adjust the contact spacing and spring/tension only a little at a time, following the maker’s instructions.

    Choose by your next three months, not your imagined final speed

    Use this decision guide:

    1. You are learning basic element timing and have access to a straight-key input: start with a straight key at relaxed speed.
    2. You already copy code comfortably but sending timing distracts you from the QSO: try a paddle and keyer, one lever at a time.
    3. You enjoy manual sending and want a lateral, personal style: borrow or build a sideswiper and use it slowly for a few practice sessions.
    4. Your hand becomes tense, numb, or painful: pause; improve height, support, key stability, and workload before choosing a different mechanism.
    5. You are buying blind: do not make the decision from a photo. Ask a local club member if you can send a few minutes on their key, ideally with your normal chair and desk height.

    Speed is only one consideration. The operator who sends 15 WPM with even spacing, comfortable posture, and calm repeats is easier to work than the operator who sends faster code that is tiring or crowded.

    A fair comparison drill

    If you can borrow two or three key types, make the comparison controlled. Use the same sidetone pitch, a comfortable listening level, and a modest speed. Send the same short text for two minutes on each key. Record the audio if possible. Then ask:

    • Which key made your hand tense first?
    • On which key did word spaces disappear?
    • Could you send CQ CQ DE YOURCALL three times without correcting yourself?
    • Did you enjoy the motion enough to practice again tomorrow?

    The last question matters. Consistent, pleasant practice will improve your sending more than a theoretically ideal mechanism that remains in a drawer.

    To rehearse a normal contact after choosing a key, use the CW599 QSO Simulator. For a focused check on whether your characters and spacing are recognizable, the CW599 Morse Translator is useful alongside your sidetone recording. These tools do not replace listening to real operators, but they make short, repeatable practice sessions easy to set up.

    The best first key is the one you can send clearly and comfortably

    Straight keys teach direct timing. Paddles let an electronic keyer make repeatable elements. Sideswipers keep timing manual but change the motion and feel. Each can support a good CW QSO when it is adjusted safely, used at a sensible speed, and paired with patient listening.

    Start with the key available to you, practice short sessions, and judge the result by clarity and comfort. The next key can be an experiment, not a verdict on your ability.

    Sources and further reading

  • Straight Key Timing: Dits, Dahs, Spacing, and Better Rhythm

    Straight Key Timing: Dits, Dahs, Spacing, and Better Rhythm

    A straight key gives the operator direct control over every dit, dah, and gap. That simplicity is part of its appeal, but it also means that the rhythm comes from the hand rather than an electronic keyer.

    Readable straight-key CW is not created by hitting the contact harder or moving faster. It comes from consistent proportions, clear spacing, relaxed movement, and careful listening.

    The standard Morse timing units

    International Morse timing is built from one basic unit:

    Part of the signalLength
    Dit1 unit
    Dah3 units
    Gap between elements of one character1 unit
    Gap between characters3 units
    Gap between words7 units

    The ITU-R M.1677-1 recommendation is the international reference for Morse signals and their spacing.

    For the letter A (.-), the timing is:

    1 unit ON
    1 unit OFF
    3 units ON

    The three-unit character gap begins after the dah. Do not add an extra one-unit element gap after the final element; the complete silence between characters is three units.

    Converting WPM into milliseconds

    Standard Morse speed is conventionally based on the word PARIS, which occupies 50 timing units. A useful approximation for the duration of one dit is:

    dit duration in milliseconds = 1200 / WPM

    Examples:

    SpeedDitDahCharacter gapWord gap
    10 WPM120 ms360 ms360 ms840 ms
    15 WPM80 ms240 ms240 ms560 ms
    20 WPM60 ms180 ms180 ms420 ms

    You do not need to count milliseconds while sending. The table is useful for calibrating a trainer, analyzing a recording, or understanding why a slightly long dit can turn into a short dah at higher speed.

    What makes straight-key CW difficult to copy

    Dahs that are too short

    If a dah is only twice as long as a dit, characters such as A, N, U, and D become less distinct. Aim for an audible 1:3 relationship, not a tiny difference.

    Dits that grow under tension

    When the hand becomes tense, dits often lengthen. This makes H sound like an uneven series and can blur the difference between a dit and a dah.

    Missing character spaces

    Even perfectly formed elements become unreadable when characters run together. Many sending problems that sound like incorrect letters are actually spacing problems.

    Excessive word gaps

    Very long pauses inside a sentence can make the other operator think the transmission is finished. Word gaps should be clearly longer than character gaps without breaking the flow.

    Correcting inside a malformed character

    Once a character has gone wrong, trying to repair it mid-pattern usually creates an unknown sequence. Stop, leave a clear gap, send the error prosign if appropriate, and repeat the word.

    Adjust the key before practicing

    A straight key should not force the hand to fight the mechanism.

    Contact gap

    Start with a small but definite contact gap. Too wide a gap requires excessive travel and encourages pounding. Too narrow a gap may cause accidental contact or a sticky feel.

    There is no universal measurement because keys, bearings, springs, and operator preference differ. Make small adjustments and test them with the key connected to a sidetone oscillator or transceiver in practice mode.

    Spring tension

    Use enough return force for the contact to open reliably. Excessive tension causes fatigue and makes short elements harder to control. Very light tension can feel vague and may lead to unintended closures.

    Knob height and arm position

    Place the forearm comfortably on the desk with the wrist close to neutral. The movement should come from a relaxed forearm and wrist combination, not from lifting the entire shoulder or pinching with the fingertips.

    Some skilled operators use different techniques. The important test is whether the motion remains relaxed and repeatable for an entire contact.

    Listen to the sidetone, not the hand

    Mechanical movement is only an indirect signal. The other operator hears the transmitted rhythm.

    Use a sidetone that is comfortable, commonly somewhere around 500 to 750 Hz. Close your eyes for part of the exercise and listen for:

    • Consistent dit length
    • Consistent dah length
    • A clear difference between dit and dah
    • Equal element spacing inside a character
    • Stable character and word gaps

    Record one minute of sending and copy it later as if it came from another station. CW Academy also recommends recording and playing back sending as a way to assess rhythm in its beginner curriculum.

    Five practical straight-key drills

    1. Alternating elements

    Send:

    E T E T E T

    Listen for a stable 1:3 length ratio. Leave a full character gap between each letter.

    2. Repeated simple characters

    Send:

    EEEEE TTTTT AAAAA NNNNN

    The goal is not maximum speed. Every repetition should sound like the same character.

    3. Balanced pairs

    Send:

    AN AN AN   RN RN RN   SK SK SK

    These combinations expose element and character spacing. If the letters merge, increase the character gap without slowing the elements.

    4. The word PARIS

    Send PARIS repeatedly at a comfortable pace. It contains a useful mixture of element patterns and is also the reference word used for standard WPM timing.

    Leave a seven-unit word gap before repeating it:

    PARIS   PARIS   PARIS

    5. A real QSO line

    Send:

    CQ CQ DE BA7MTH K
    UR RST 579 NAME JOHN
    TNX QSO 73 SK

    Operational phrases reveal whether rhythm remains stable when attention shifts from element formation to meaning.

    Use spacing to slow down

    When another operator asks QRS, avoid stretching every element far beyond its normal ratio. Send recognizable characters at a comfortable character speed, then add more space between characters and words.

    This is similar in principle to Farnsworth timing. The character retains its sound identity while the overall exchange becomes easier to copy.

    For example, a character may still sound close to 15 WPM while the wider spacing makes the effective message rate closer to 8 or 10 WPM.

    Build speed only after rhythm is stable

    Increase speed in small steps. A useful progression is:

    1. Send a one-minute drill at a relaxed speed.
    2. Record and listen back.
    3. Identify one problem, such as short dahs or narrow letter gaps.
    4. Repeat the drill while correcting only that problem.
    5. Increase by 1 or 2 WPM after several clean sessions.

    Trying to fix speed, grip, dah length, and spacing all at once makes it difficult to know what improved.

    Fatigue changes timing

    Straight-key sending is physical. As the forearm tires, the hand may press harder, dits may lengthen, and spacing may collapse.

    Stop a focused drill after 5 to 10 minutes, loosen the hand, and rest. During a longer QSO, reduce speed before timing deteriorates. Pain, numbness, or persistent strain is not a normal training requirement.

    Measure without becoming mechanical

    Timing analysis can identify patterns that the ear misses, but the final goal is natural, readable communication. A waveform can show that your average dah is 2.6 units, yet only listening reveals whether the complete message has an easy rhythm.

    Use numbers for diagnosis, then return to the sidetone. The best straight-key sending has consistent proportions without sounding lifeless.

    A clean rhythm is your signature

    Every straight-key operator has a small personal character, but individuality should sit on top of readable timing. Keep dits short, dahs clearly longer, spaces deliberate, and motion relaxed.

    Practice slowly enough to control the rhythm, then let speed grow from consistency. A well-sent 12 WPM signal will usually be copied with more pleasure than an uneven 20 WPM signal.

    Sources and further reading

  • How to Copy Morse Code by Ear (Without Counting Dots and Dashes)

    How to Copy Morse Code by Ear (Without Counting Dots and Dashes)

    Learning the Morse chart is not the same as copying CW. A chart teaches that C is -.-., but an operator on the air does not have time to translate four separate elements into a letter. The useful skill is hearing the complete rhythm of C and recognizing it immediately.

    That change, from visual translation to audio recognition, is the foundation of reliable CW copy. This guide explains how to make it without turning every practice session into a speed test.

    Why counting dots and dashes becomes a dead end

    At very low speed, it is tempting to count: dah, dit, dah, dit, then search a mental chart. The method feels safe because it produces an answer, but it builds a long chain:

    1. Hear individual elements.
    2. Count and remember their order.
    3. Convert the pattern into a visual symbol.
    4. Search for the matching character.
    5. Write the character.

    Real CW keeps arriving while that chain is running. One delayed character can make the next character late, and soon the whole word is lost.

    CW Academy's beginner curriculum describes Morse code as an audio language and tells students to learn the complete sound pattern rather than the individual dits and dahs. This is also why faster character speed with wider spacing is often more useful than making every element extremely slow.

    Hear one character as one sound

    Think about a short spoken word. You normally recognize its shape without naming every phoneme. Morse characters can be learned in the same way.

    For example:

    • E is a very short sound.
    • T is one long sound.
    • A has a rising short-long rhythm.
    • N has a falling long-short rhythm.
    • C has a balanced long-short-long-short rhythm.

    The labels above are only orientation. During practice, do not say "dit" or "dah" in your head. Let the sound trigger the character.

    This is commonly called instant character recognition. It does not mean zero mistakes. It means the answer appears quickly enough that you can stay with the stream.

    Use character speed and effective speed separately

    Farnsworth timing keeps each character reasonably brisk while adding more silence between characters and words. The extra time gives your brain space to recognize and write the answer without stretching the character itself into a countable sequence.

    A practical starting range is:

    SettingStarting pointWhat it controls
    Character speed18 to 25 WPMThe rhythm inside each character
    Effective speed5 to 10 WPMThe overall pace after extra spacing
    Tone500 to 750 HzListening comfort, not difficulty
    Session length5 to 15 minutesFocus before fatigue appears

    These are training ranges, not rules. If 25 WPM characters sound like an indistinct blur, step down slightly. If you can count every element comfortably, increase the character speed. Keep the effective speed slow enough that you can recover after a miss.

    A five-stage copy routine

    1. Learn a small character set

    Start with two to four characters whose sounds are clearly different. A useful first group is E, T, A, and N. Play random sequences and type or write only the character you hear.

    Do not repeat the sound mentally after it has passed. Make the best decision you can and prepare for the next character.

    2. Add characters by sound, not alphabet order

    Alphabet order has no special value in audio learning. Add a few characters at a time and mix new sounds with familiar ones. If two characters are repeatedly confused, isolate that pair for one short drill, then return them to a larger group.

    3. Move from characters to useful chunks

    Random characters build recognition, but operators also benefit from common sound groups:

    • CQ
    • DE
    • RST
    • QTH
    • NAME
    • 73
    • K, KN, and SK

    These become audio landmarks in a contact. When you hear RST, you already know that a report is likely to follow.

    4. Copy real callsigns

    Callsigns are excellent intermediate material. They combine letters and numbers, have recognizable prefix structures, and force you to copy exactly rather than guess from ordinary language.

    Use the CW599 Callsign Trainer for short rounds. Set a comfortable WPM, hide the answer, listen once, and enter what you heard. A five-minute session with full attention is more valuable than thirty minutes of distracted repetition.

    5. Practice the structure of a QSO

    Once characters and callsigns are stable, move into predictable exchanges. The CW599 QSO Simulator lets you rehearse CQ, callsigns, RST, name, QTH, and 73 in sequence.

    Predictability is useful here. It reduces the number of unknowns while you learn to copy behind, recover after a missed character, and recognize operating patterns.

    What to do when you miss a character

    The most damaging habit is freezing. A missed character is already gone. If you replay it in your head, you will often miss two more.

    Use this recovery method:

    1. Mark the unknown with a short dash, a space, or ?.
    2. Keep listening immediately.
    3. Use the rest of the word or exchange for context.
    4. Review the missed character after the exercise.

    On paper, leave enough space to add a character later. On a keyboard, resist the urge to backspace during live copy.

    Short practice beats one long weekly session

    CW recognition depends on fast recall. Frequent short exposure strengthens that recall while fatigue does the opposite.

    A simple weekly pattern is:

    DayMain exerciseTime
    MondayCharacter groups10 minutes
    TuesdayCallsigns10 minutes
    WednesdayCommon CW words and abbreviations10 minutes
    ThursdayQSO exchange15 minutes
    FridayDifficult character pairs8 minutes
    WeekendRelaxed listening or an on-air contact15 to 30 minutes

    Keep a small log with the date, settings, score, and two difficult characters. The purpose is not to collect perfect scores. It is to notice what should be practiced next.

    Common mistakes that slow progress

    Watching the answer while listening

    Reading and hearing at the same time can create visual recognition instead of audio recognition. Hide the text until after you respond.

    Practicing only familiar material

    Repeating one memorized phrase can sound fluent without improving general copy. Mix callsigns, numbers, abbreviations, and short phrases.

    Increasing speed after one good score

    Look for consistency across several sessions. A temporary high score may come from lucky material or guessing.

    Treating every miss as failure

    Training near the edge of your ability should produce some errors. The useful question is whether recognition is becoming faster and recovery is becoming easier.

    Copying every word on paper forever

    Writing is valuable, especially for callsigns, numbers, and traffic. As recognition improves, occasionally listen without writing and try to retain one short phrase. This begins the transition toward head copy.

    A practical two-week plan

    For the first week, spend most of the time on characters and callsigns. Keep character speed high enough that counting is uncomfortable, but use generous spacing.

    During the second week, keep one short character drill and add structured QSO material. Copy only the essential information: callsign, RST, name, QTH, and closing. This is closer to how many real contacts are logged.

    At the end of two weeks, compare your first and latest sessions. Improvement may appear as fewer long pauses, cleaner recovery, or better callsign accuracy before it appears as a higher WPM number.

    The goal is readable communication

    CW is not a race. Speed is useful only when recognition remains dependable and the operator can stay calm after a mistake. Train complete sounds, leave enough spacing to think, and increase effective speed gradually.

    When you are ready, open the Callsign Trainer for a five-minute round, then try one exchange in the QSO Simulator. The route from chart knowledge to real CW is built one recognized sound at a time.

    Sources and further reading