Prepare the field connections
Check the antenna, rear KEY socket and the chosen power source with the actual battery arrangement fitted. Leave cable slack so a key lead cannot pull loose when the radio moves.
The PMR-171 combines a built-in CW decoder with a keyer, practice mode and stored messages. For field use, prepare the key and power connections first, get one signal clear by ear, and then use the decoder as a check. This guide follows the official English V2.1 manual listed as updated in 2026, with four CW memory entries.
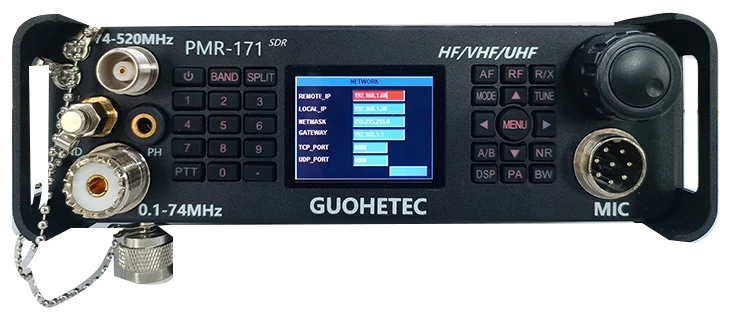
Checked 2026-09-09 against the official English PMR-171 User Manual V2.1, listed as updated in 2026 (42 PDF pages; file metadata dated 2026-01-01). References use printed page numbers; printed p. 20 is PDF page 21. Four CW memories follow the CW-specific instructions. Regional firmware and hardware may differ; unclear protocol ranges are not asserted. Guide v1.0; document review, not a hardware or battery test.
Use this order as an operating checklist, not as a replacement for the radio manual. Controls and available options can vary by firmware and region.
Check the antenna, rear KEY socket and the chosen power source with the actual battery arrangement fitted. Leave cable slack so a key lead cannot pull loose when the radio moves.
Select CW, hold BAND and enable TRAINING. Choose KEY MODE, KEY SPEED and STF/STG, then verify dot/dash direction and no RF output while practising.
Tune the station by ear, choose BW and compare RFG/IFG only as needed. Recheck the wanted signal after moving the antenna or changing the field setup.
Use BAND > DECODE and make small THRESHOLD adjustments. Compare repeated characters with your listening; the decoder is not a replacement for confirming the callsign and exchange.
Review A-CALL KEY1–KEY4, COUNT and DELAY. After listening and checking the transmit frequency, disable TRAINING for one controlled low-power call and verify return to receive before repeating.
Yes. The official PMR-171 V2.1 manual explicitly lists a built-in decoder and the DECODE/THRESHOLD controls. Use the text alongside listening, especially outdoors where moving antennas and changing noise can quickly alter reception. It does not make every weak or irregularly sent signal readable.
Select CW, tune one station and listen to a repeated word. Use BW and RFG/IFG to improve separation if needed, then leave the setup unchanged while comparing decoder settings.
Hold BAND to enter the CW settings, use up/down to choose DECODE and left/right to enable it. Return to reception and observe text during the station's transmission; TRAINING and A-CALL have separate purposes.
Note the current THRESHOLD and make small changes within 1–50. Look for more complete repeated characters without extra letters during gaps. Restore the previous value if the change is unhelpful.
Listen again to callsigns and numbers, and request a repeat where needed. If the signal fades, wait for a clearer transmission instead of treating the last displayed word as reliable. Recheck tuning when the field antenna moves.
Confirm CW and DECODE, then check whether you can hear a clean signal. Widen an overly tight BW and revisit THRESHOLD. A-CALL text being stored successfully does not test receive decoding.
Identify the intended note by ear, retune and adjust BW to separate it. Compare receive gain and threshold only after the wanted station is clear; avoid changing several settings at once.
Check antenna position, cable connections, interference and the received tone again. Restore a known receive setup before altering THRESHOLD; moving the equipment can change the input signal without any menu setting changing.
Search by control or menu path. References distinguish manufacturer manuals, distributor editions and firmware notes; documented defaults, source recommendations and CW599 advice are labeled separately.
Rear KEY socket; CW: hold BAND > KEY MODECW599 note: KEY uses the timing supplied by a straight key or external electronic keyer; AUTO-L and AUTO-R generate elements internally with opposite paddle directions. Test both contacts in TRAINING after attaching the field battery and routing the cable. A physically secure plug and the correct mode solve different problems.
CW: hold BAND > KEY SPEEDCW599 note: This changes internal-keyer timing, not the incoming signal or the decoder's target speed. Send a short familiar word in TRAINING using the key position you will use outdoors. Reduce the setting if gloves, cold hands or an unstable support make the spacing inconsistent.
CW: hold BAND > STF or STGCW599 note: Choose STF by how clearly you hear the keying, then adjust STG for its loudness. Compare a short practice word before and after each change, especially when switching between speaker and headphones. The manual's frequency-range text is inconsistent; the picture's 750 Hz is an example, not an established factory default.
CW: hold BAND > TRAININGCW599 note: The manual describes TRAINING as practice with transmission disabled. Use it to check keying in a new field position, and verify no transmit-power indication when you press the key. It does not turn on receive decoding and does not prove that a stored message is correct. Turn it off deliberately only for the prepared on-air test.
CW: hold BAND > TX-RXCW599 note: This is the waiting time after keying before the receiver becomes available again. Use a brief controlled transmission to check whether you can hear the start of a reply. Do not infer a complete millisecond range from the manual's incomplete protocol entry, or assume a minimum setting proves QSK with external equipment.
Press MODE for CW; hold MODE to change CW sideband; check SPLITCW599 note: Reversing the CW sideband can change how a nearby interfering signal falls relative to the wanted note. Retune and compare the sound after changing it. If SPLIT is enabled, the manual identifies the upper frequency as receive and the lower as transmit; confirm both before touching the key.
Press BW > select with left/right > press BW to finishCW599 note: Use BW after tuning to reduce a nearby signal that competes with the one you want to copy. The green selection indicator returns to white when adjustment ends. If characters become less readable or the note vanishes, widen the passband and retune before asking the decoder to solve the problem.
Press RF > select RFG/IFG with left/right > adjust with up/downCW599 note: The manual lists 50 for both gain defaults; that is a documented starting point, not a promise of best reception at every site. Adjust one control at a time when a stronger antenna or interference changes the sound. Confirm improvement by clearer complete characters rather than a louder noise floor.
CW: hold BAND > DECODECW599 note: This enables the built-in receive text display for CW/RTTY. CW decoding is distinct from the internal keyer, TRAINING and A-CALL. Compare stable repeated content with your ear; a few correct words do not establish that a weak callsign or serial number was copied correctly.
CW: hold BAND > THRESHOLDCW599 note: THRESHOLD sets the decoder's signal-detection criterion. Use it after tuning and gain/filter checks, then observe whether real characters improve without extra letters during gaps. It is unrelated to the VSWR protection threshold. If your experiment makes copy worse, return to the recorded value and recheck the signal.
Hold MENU > A-CALL > select KEY1–KEY4 > press MENU to editCW599 note: Type a short message containing your own callsign with the keypad or USB keyboard. The CW procedure specifies KEY mode for playback. Verify the text and the selected entry before the on-air test; V2.1's CW section specifies four entries, so this guide does not import the five-entry text left in its RTTY section.
Hold MENU > A-CALL > COUNT or DELAYCW599 note: Repeated calling is RF transmission, not a decoder exercise. Check that the stored message is correct, then leave enough delay to hear an answer and to operate the key comfortably. Observe a complete call-and-listen cycle before raising COUNT; do not let an unfamiliar field setup begin a long sequence.
Hold MENU > ABOUT > MODEL/HW/SW; inspect rear power and KEY connectionsCW599 note: Record MODEL/HW/SW so the official download can be matched to your hardware and region. For the field setup, fit the intended battery and key together and check cable access before packing. Use the supplied charger for charging, not as the operating supply; follow the manual for the regulated DC supply.
No matching settings. Try a shorter search or clear the search and category.
These are original operator-oriented starting points. They are not factory presets and intentionally avoid claiming model-specific default values.
A calm setup for learning the radio.
A patient workflow for signals close to noise.
For operators who need quicker station turnaround.
Both are documented. DECODE displays received CW/RTTY text; KEY MODE and KEY SPEED handle your keying; A-CALL stores outgoing messages. Enabling one does not configure all the others.
The reviewed 2026 V2.1 manual consistently gives KEY1–KEY4 in its A-CALL and CW sections. Its RTTY section retains a five-entry instruction. This guide follows the CW-specific four-entry instructions and asks you to check the menu shown by your firmware.
No. The official download area contains files for different models, hardware versions and regions. Read MODEL/HW/SW in ABOUT and follow the matching package instructions. A larger version number alone is not enough to establish compatibility.
Open the official download page and choose the English V2.1 manual for this model. The manufacturer protects direct PDF downloads, so use its page if a saved PDF address fails. Match firmware to your hardware and region. CW599 does not host or reproduce the manual.
Search and filters run locally in your browser and do not connect to or control the radio. Version 1.0 (2026-09-09): bilingual CW guide, decoder workflow, real product cutout and source references. Revisions are retained in site Git and deployment backups; no separate archived page is available.