
Connect and select
Select the correct MENU > KEY JACK setting.
KH1 combines a small paddle-oriented interface with received-CW text and transmit-text logging. The controls below apply to the B7 manual, including TX TEST and TX & RX decoding; installed antenna and tuner options still determine the field setup.
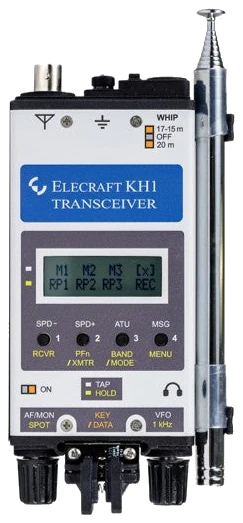
English Owner’s Manual B7 (31 January 2026), errata B7-1 (2 February 2026), production MCU 1.27 (12 January 2026). Checked 2026-09-24; printed manual pages. Fitted options and regional availability vary. Variable QSK delay and 1 WPM steps below 20 WPM require 1.27 or later; the errata says VBAT amp-hour reading/reset is not implemented.
Use this order as an operating checklist, not as a replacement for the radio manual. Controls and available options can vary by firmware and region.
Select the correct MENU > KEY JACK setting.
Hold PFn/XMTR, then hold TST for TX TEST.
Use SPD−/SPD+ and a comfortable headphone level.
Tune first; use FL1 and TX & RX text if needed.
Check band, power and antenna, leave TX TEST and send one call.
Select TX & RX for received CW; TX ONLY and transmit logging have different purposes. The B7 manual recommends the narrow FL1 filter for receive text.
Set MENU > TEXT DEC to TX & RX.
Tune a clear signal and select RCVR > FL1.
Watch ^ for detected signal and _ for none beside the mode letter. If tuning and FL1 are insufficient, follow the PAN THR setting below, including antenna disconnection; reconnect before listening again.
Compare the scrolling call with the audible signal; the regular second line returns after inactivity.
Return to the receive-decode setting above, confirm a steady audible CW signal and retune before changing more parameters. Transmit echo alone does not confirm receive decoding.
Listen to one complete call and compare it with the display. Fading and irregular spacing can defeat the decoder; request a repeat and copy by ear instead of completing an uncertain callsign from guesses.
Center the wanted signal first, then narrow the receive filter gradually. If the wanted tone disappears, widen the filter and tune again. Stop adjusting when a clear tone and stable text agree.
Search by setting or menu path. Manufacturer defaults and recommendations are labeled separately from CW599 advice; references identify the checked manual or software version.
MENU > KEY JACKCW599 note: Choose the connected key rather than RS232. This shared connector changes role for computer control; check the menu again after firmware work and verify both paddle contacts.
Hold PFn/XMTR > hold 3 (TST)CW599 note: Enter TX TEST before practicing. Confirm the display and absence of RF, especially before recording a message while a field antenna is connected.
Tap SPD− / SPD+CW599 note: Choose a speed that leaves clear spaces with a small field paddle. These buttons also alter playback speed; recheck a stored CQ after changing them.
Tap AF/MON; hold AF/MON for SPOTCW599 note: After tapping the knob, AF/MON changes monitor volume and VFO changes pitch; tap a control to exit. Hold AF/MON for SPOT and tune the received note to match the reference, then tap to exit. If changing pitch leaves the filter off-center, follow the manual’s ADJ BFO procedure rather than guessing calibration values.
Hold RCVR > tap 1 / 2 / 3CW599 note: Tune with a wider filter first, then select FL1 for decoding. If the wanted note vanishes, widen and retune instead of raising AF gain to chase a signal outside the passband.
MENU > TEXT DECCW599 note: Select TX & RX to show incoming CW on LCD line 2. The ^/_ indicator helps show detected signal activity; require a steady audible tone and compare the displayed callsign by ear.
MENU > PAN THRCW599 note: Check this only after tuning and FL1. Keep TX TEST active, disconnect the antenna, then increase PAN THR until AFCMP changes from 0 to 1. Reconnect the antenna and compare audio with text. This also affects mini-pan; larger values do not mean greater sensitivity. The manual says other settings raise the threshold and may help in heavy interference.
MENU > QSK DELAYCW599 note: The zero-delay setting permits rapid return to receive. Increase delay if band noise between elements is distracting; compare by sending a short phrase in the actual field listening setup.
Manual reference: KH1 Owner’s Manual B7, pp. 20, 34; errata B7-1
MSG > hold 4 REC > 1–3; GRP selects 4–6CW599 note: Record with the internal paddle keyer and tap a switch to finish. Play once in TX TEST before using repeat; hold the message key only when repeated CQ is intended. Check MSG RPT before repeating and verify how playback is stopped in TX TEST; a flashing r means repeat remains active.
MENU > LOGGINGCW599 note: Set ADJ DATE and ADJ TIME, then use the internal keyer and check VIEW. Transmitted text is uppercase; TX TEST notes are lowercase, not an automatic received-QSO log. For export, unplug the paddle, select KEY JACK RS232, connect KXUSB, open KH1 Utility Command Tester, then select SEND TO PC and exit the menu. Save and inspect the text before considering ERASE, which deletes the entire log on menu exit.
No matching settings. Try a shorter search or clear the search and category.
These are original operator-oriented starting points. They are not factory presets and intentionally avoid claiming model-specific default values.
Check one change at a time.
Keep the wanted signal audible.
Leave a clear path back to receiving.
No. Select TX & RX; incoming text appears on line 2.
No. It captures your internal-keyer text and metadata; review the other call, exchange and completion by ear.
The manual describes moderate to strong signals for receive decoding. Use FL1, tune carefully and copy by ear when the display fails.
Use the manufacturer-controlled product and support pages to verify your region, firmware, menus, connector wiring, operating limits, and safety information. CW599 does not host, mirror, or reproduce the manual.
Search and filters run locally in your browser and do not connect to a radio. Version 1.0 (2026-09-24): bilingual guide and sourced product photo. Revisions are retained in site Git and release backups; no separate archived page.